Even with an entry level instrument, it’s possible to produce very pleasant sound as long as you playing technique is correct. These are the fundamental techniques to make good sound.
Bow Between the Bridge an Fingerboard
The picture below highlights the three areas of sounding points. Near the bridge, blue. Halfway between bridge and fingerboard, green. Near the fingerboard, yellow.
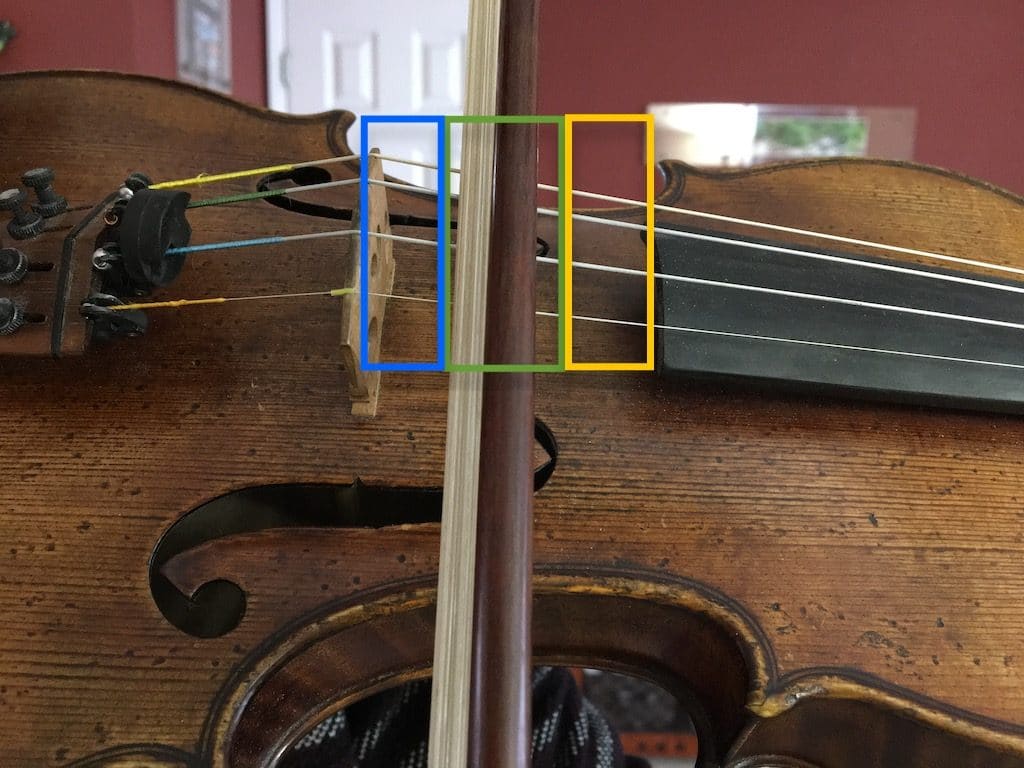
Sounding point is the contact point between the bow and the strings and its optimal position depends on the position of the left hand. In general, when the left hand plays in lower positions (closer to the scroll of the violin), the bow has to be approximately halfway between the bridge and the end of fingerboard (green zone in the picture above). This is also the optimal area of sound points for beginning level playing since most beginning repertoires only require lower position playing. If the bow is too close to the fingerboard (yellow zone), the sound becomes soft and hollow. Coupled with other common beginner problems such as excessive bow pressure and slow bow speed, the sound quality could severely deteriorate. If the bow is too close to the bridge (blue zone), it produces a squealing sound.
When the left hand plays in higher positions (closer to the bridge), the bow has to be near the bridge (blue zone) and have enough weight in order to maintain solid sound quality. In this case, if the bow plays in the green and yellow zone, it’ll produce a howling like sound or lowering of pitch. As you can see, we always need to maintain certain distance between the sounding point and the left fingers where they stop (press) the string.
While we don’t want the bow to be too close to the bridge or the fingerboard, slight changes of sounding points allow us to produce different types of acceptable sound quality. For example, in lower positions, playing slightly closer to the bridge and having enough bow weight will produce a stronger sound. Conversely, playing closer to the fingerboard with less bow weight will produce a lighter and transparent sound.
Tips:
- Try playing at different sounding points and applying different amount of bow weight. Listen for the difference and determine the degree of acceptableness.
- On an entry level instrument, most likely you’ll need to place the bow slightly closer to the bridge even for low position playing. Mediocre instruments are not very forgiving and the sweet spot is very small. You’ll need to experiment with tips no.1 to find the sweet spot of a particular instrument.
Bow Parallel to the Bridge
In the Posture and Geometry page we discuss how to keep the bow parallel to the bridge. This requirement is directly related to the sounding point principle. Watch the following two wrong posture videos from the Posture and Geometry page. You’ll notice that the reason behind the unpleasant sound is because of inconsistent sounding point as the bow slides across the string. Visit the Posture and Geometry page to learn about bow angle correction and be aware of the optical illusion problem of the bow and bridge when checking from the player’s view.
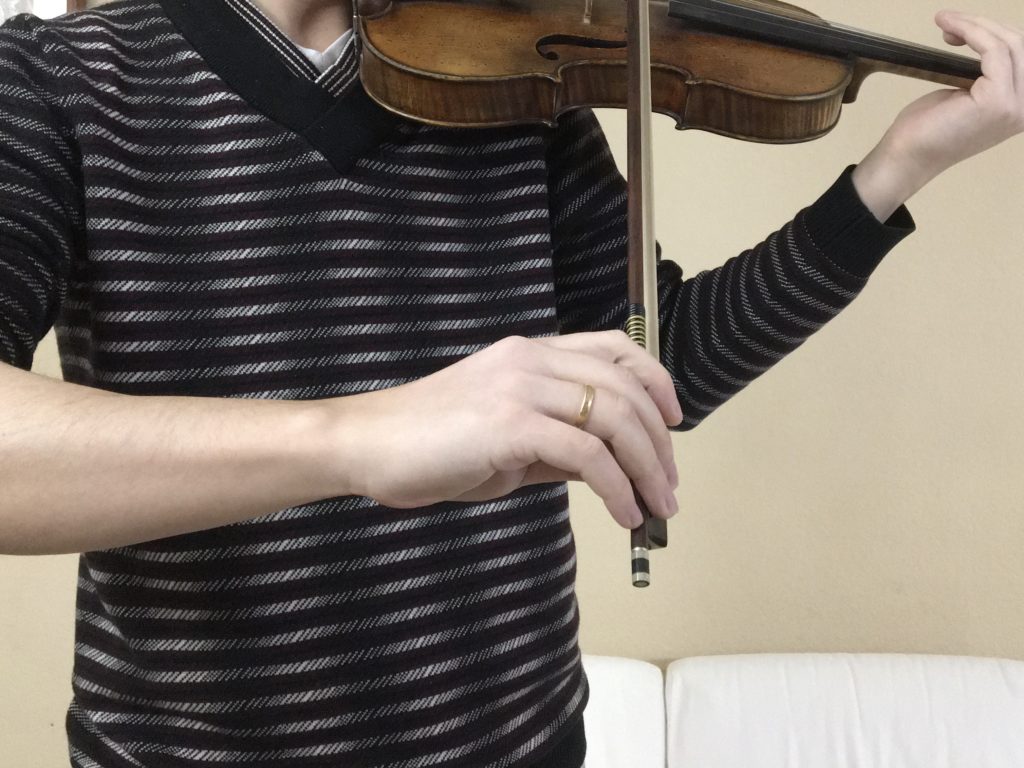
Don’t Over Tilt the Bow Stick Backward
When the bow hair is flat on the string, it creates more sound. When the bow stick is tilting forward away from the player, the sound is thinner and the bow feels more flexible because there’s less amount of bow hair on the string. The adjustment of bow hair is especially useful when softening or sharpening the quality of spiccato stroke, increasing the amount of ricochet stroke (how many times the bow can bounce on the string), and increasing the clarity of sautille stroke.
In normal playing, the bow can only tilt forward away from the player, but not toward the player, except in advanced bow technique such as Col Legno (playing with bow stick).
Acceptable amount of forward tilting:
Backward tilting is unacceptable in normal playing:

Backward tilting problem could be caused by improper right hand posture such as low wrist or straight thumb.
Tips:
- When changing bow at the frog, tilt the bow forward slightly to compensate the stiffness of the bow hair.
- Excessive forward tilting could result in hollow sound and bow stick hitting the strings.
Don’t Play Too Heavily or Lightly. Keep the Bow Moving.
For a more scientific explanation of the bow weight-speed relation, please read “The Physics of the Violin” by Bernard Richardson in “The Cambridge Companion to the Violin.” The general rule is that the bow needs enough weight to maintain contact with the strings, and it needs to move fast enough so that the string keeps vibrating properly. As bow weight increases, bow speed also needs to increase. Over pressure and lack of bow speed can cause very scratchy sound and the pitch can become lower (for example G becomes G-flat). Excessively light and fast bow can cause airy sound and the bow loses control. It’s important that bow weight naturally comes from the arm’s own weight and the bow should not be pressed down with excess force.
Bow speed handling in violin playing is different from viola playing. Violin strings have relatively low mass and the bow could begin moving at a faster speed. Viola strings are thicker and has higher mass, the bow needs to start slower with more weight. This is specially noticeable on the C-string.
When playing double-stops, place most of the bow weight on the lower string and play the higher string lightly. This will also enhance sound quality as well as intonation.
Tips:
- Certain amount of bow noise is acceptable and part of the sound spectrum. Without the bow noise the sound volume is probably too soft to the listeners. The bow noise is only audible to the players themselves and will not be audible to audience sitting further away. The instrument should sound louder than you expect. If the sound is too nice and gentle then it most likely won’t project to the audience enough.
- Experiment with making bad sound will show you how mistakes could be made. Each time you make bad sound, write down what is wrong and how it contributes to the sound.
Use Just Enough Left Finger Pressure
Beginners often don’t have finger strength and press the fingers down on the strings enough, which causes whistle like or distorted sound. Increasing finger pressure slightly should improve the quality. Be sure not to over pressure the fingers as it will immobilize the left hand. For more advanced playing, more finger pressure is needed in high position as the left hand climbs toward the bridge and strings becomes higher above the fingerboard.
Drop and Lift Fingers Quickly and Use Finger Tips To Make Clean Sound
These two problems are also related to finger pressure. Because our muscles and skins are elastic, the time it takes to increase and decrease finger pressure depends on how quickly we drop and lift our fingers on and off the strings. That means if a finger drops slowly, it creates a brief moment of inadequate pressure before reaching optimal level. As we mentioned above, the lack of finger pressure creates distorted sound. Even though this distortion is very brief and it eventually transitions into normal sound, it’s very audible and will effect the clean transition between each note. This is also true when a finger lifts very slowly and it’s why we want to drop and lift fingers very quickly to achieve instant optimal pressure. This is a common problem among beginners when playing slow music. Because when the notes change slowly, we instinctively slow down our fingers.
When playing fast music, the fingers needs to move very quickly. Since our goal is to use just enough pressure without immobilizing the left hand, we want to exert the minimal and optimal amount of pressure onto a smallest possible pressure area. If the pressure area increases, then pressure is spread out and decreased. This is one of the reasons why we use finger tip, because that’s the tougher part of the finger and doesn’t expand easily.
Note that we do flatten the fingers slightly when playing vibrato. This allows the more elastic part of the finger (finger pad) to roll back and forth, creating the oscillating effect. In addition, viola playing requires slightly flat fingers due to longer string length.
The following finger tapping exercise strengthens the fingers and improves their lifting and dropping speed. Note that the fingers are lifting higher than usual for training purposes. Excessive lifting height in normal playing is unnecessary.
Tips:
- Choose a random note to play. Gradually increase and decrease finger pressure and listen to the change of sound quality. Find the optimal pressure without tightening the left hand. Do this at the low and high positions. Compare the difference.
- To strengthen fingers, practice with finger strengthener or squeeze a tennis ball.
- Practice Schraedieck School of Technique book 1. Intentionally lift fingers higher than usual and tap each finger strongly on the fingerboard until you hear the knocking sound on the fingerboard. Be sure to utilize the momentum of the finger by dropping quickly and not forcefully. Remember that excessive pressure immobilizes the left hand.
- Be sure not to play the music quickly while dropping and lifting fingers quickly. It’s the speed of the motion we’re practicing, not the music itself.